
KoboldCpp Inference
Tips
KoboldCpp is a simple and user-friendly AI model inference and text generation tool.
KoboldCpp is built on the llama.cpp inference backend and is compatible with both ggml and gguf model formats.
This tutorial will guide you through running RWKV models in KoboldCpp and having chat conversations with the model.
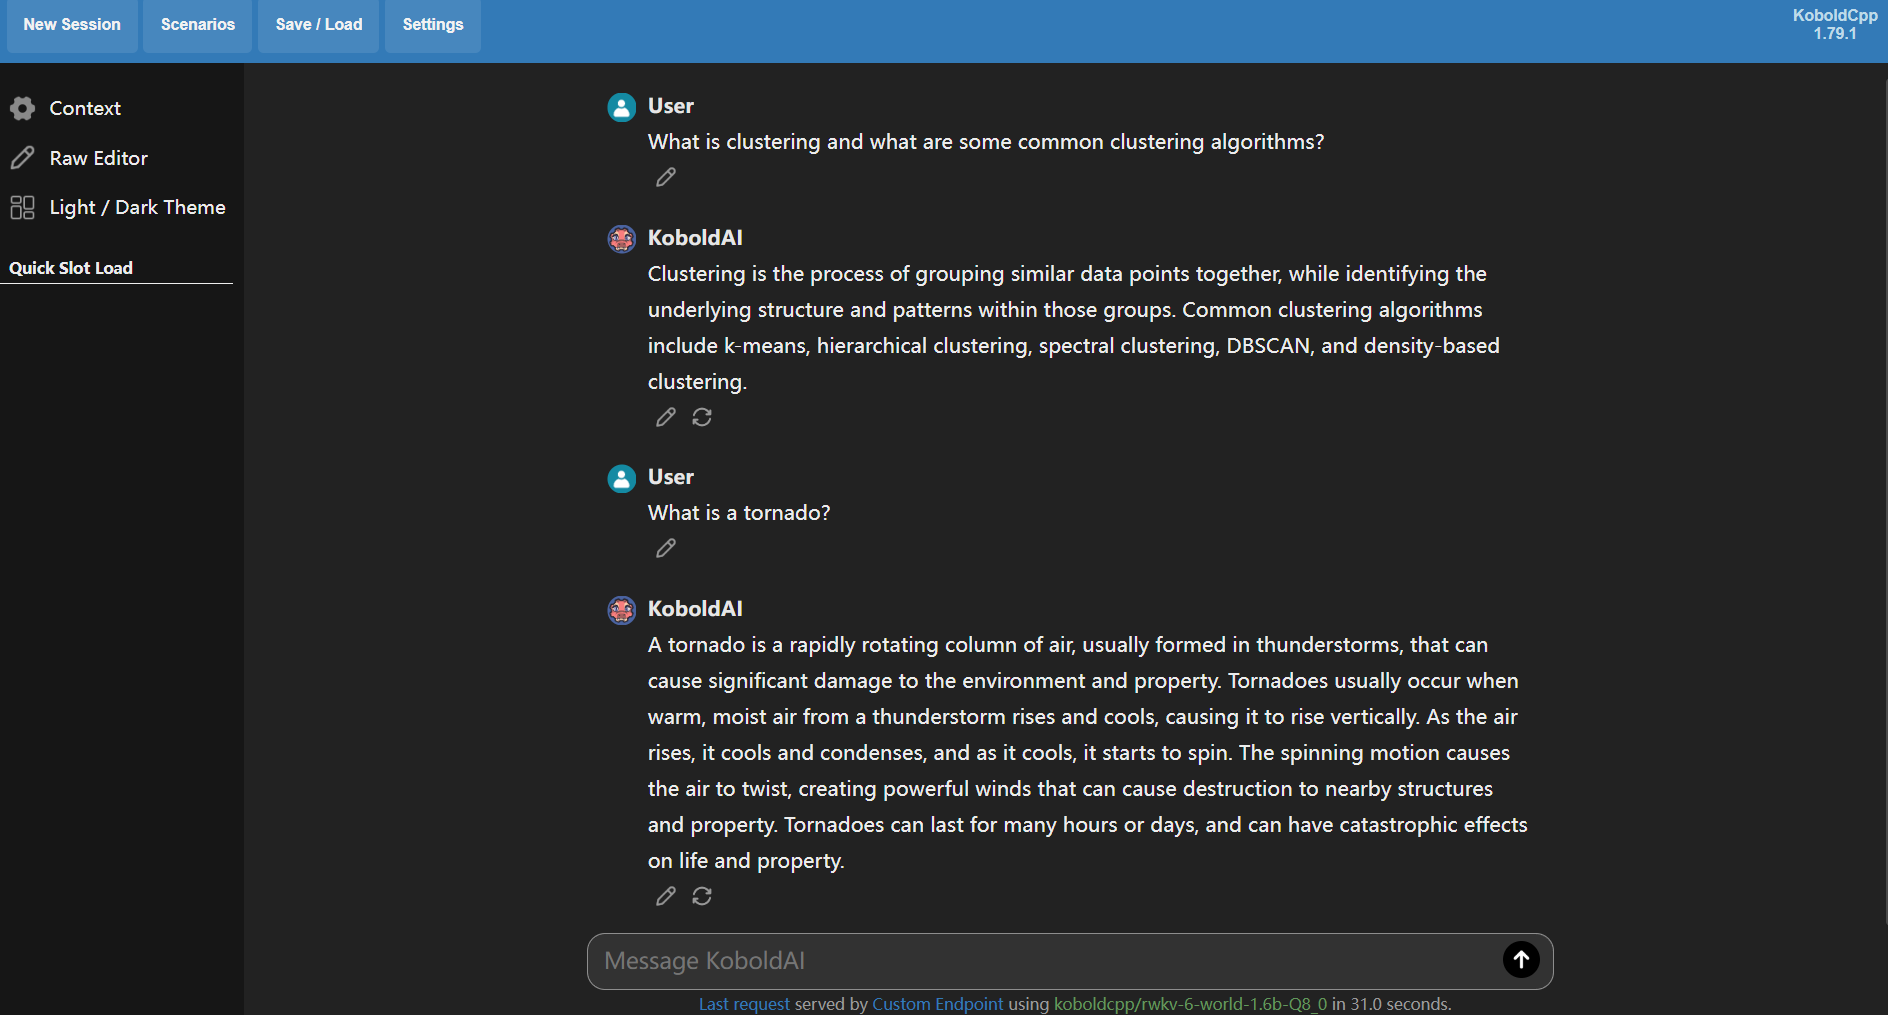
Preview
Chat Mode: Model responses are shorter, suitable for casual conversation.

Instruct Mode: Model responses are more detailed, suitable for questions or problem-solving.
Download and Installation
Download RWKV Model
KoboldCpp is compatible with both ggml and gguf model formats. It is recommended to use RWKV models in gguf format.
You can download gguf RWKV models from the RWKV-GGUF Repository. On the Hugging Face page, click the download button next to the model file to download:

Tips
The RWKV-GGUF repository provides gguf model files with different quantization precisions for each RWKV model parameter set.
Quantization affects the model's inference precision and thus the conversation quality. It is recommended to use Q5_1 and Q8_0 quantization precision to maintain model performance and user experience.
Download KoboldCpp
You can download the latest version of KoboldCpp from the KoboldCpp Releases page.
Windows System
For Windows systems, it's recommended to download koboldcpp.exe, or you can choose other exe files based on your hardware configuration:
- If you don't need CUDA (no NVIDIA GPU), you can use the smaller
koboldcpp_nocuda.exe - If you have an NVIDIA GPU but use an older CPU, and
koboldcpp.exedoesn't run, trykoboldcpp_oldcpu.exe - If you have a newer NVIDIA GPU, you can use the CUDA 12 version
koboldcpp_cu12.exe(larger file but slightly faster)
Linux System
For Linux systems, please select the Linux binary with the appropriate CUDA version:
koboldcpp-linux-x64-cuda1150: Linux binary with CUDA 11.5koboldcpp-linux-x64-cuda1210: Linux binary with CUDA 12.1koboldcpp-linux-x64-nocuda: Linux binary without CUDA
macOS System
If you're using macOS running on Apple Silicon (M1, M2, M3 ...) chips, try the koboldcpp-mac-arm64 binary.
Configuration and Running
Adjust KoboldCpp Configuration
Double-click the downloaded exe file to open KoboldCpp's launcher GUI interface:
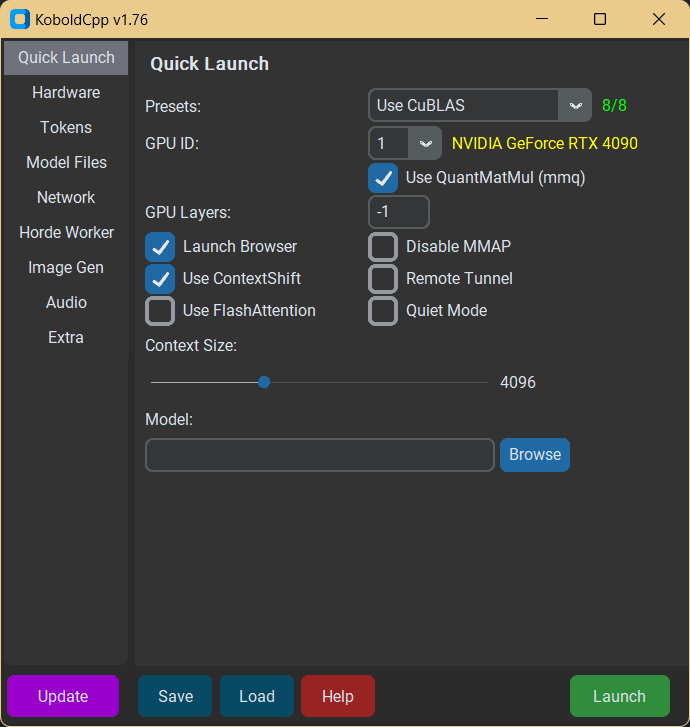
In the Quick Launch interface of the launcher, you can adjust KoboldCpp and model configurations. Focus on these three options:
Model: Click theBrowsebutton to select a RWKV model file inggufformat.Presets: Choose a method to load the model. SelectCUBLASfor NVIDIA GPUs,CLBlastfor AMD GPUs,Vulkanfor other GPUs, andOpenBLASfor CPU.Gpu layers: Number of model layers to load on GPU. Recommended to keep the default value of -1 (load all layers). If you have insufficient VRAM, gradually reduce the number of layers from the maximum:Model Parameters Maximum Layers RWKV-1.5B 24 RWKV-3B 32 RWKV-7B 32 RWKV-14B 61
Other options are recommended to keep default, or adjust as needed:
Use QuantMatMul (mmg): Whether to enableMMQmode instead ofCuBLASfor processing prompts. This is aCUBLASmode-specific option. For more detailed explanation, please refer to KoboldCpp Documentation - What MMQ DoesLaunch Browser: Whether to automatically open the browser and access KoboldCpp's WebUI after loading the modelUse ContextShift: Whether to use ContextShift to reduce context reprocessing time. For more detailed explanation, please refer to KoboldCpp Documentation - ContextShiftUse FlashAttention: Whether to use FlashAttention to optimize memory usage, only effective forCUDA/CuBLASmodeQuite Mode: If selected, the terminal will not display the model's generated text contentRemote Tunnel: Whether to allow other devices to connect to KoboldCpp using remote tunnels. For more detailed explanation, please refer to KoboldCpp Documentation - Remote TunnelContext Size: Set the maximum context length that KoboldCpp can process, recommended to keep the default value of 4096 for RWKV models- For explanations of other parameters, please refer to the KoboldCpp Documentation
Running KoboldCpp
After configuration, click the Launch button in the bottom right corner to start KoboldCpp.
The KoboldCpp launcher GUI will automatically close and open a browser to access KoboldCpp's WebUI interface:
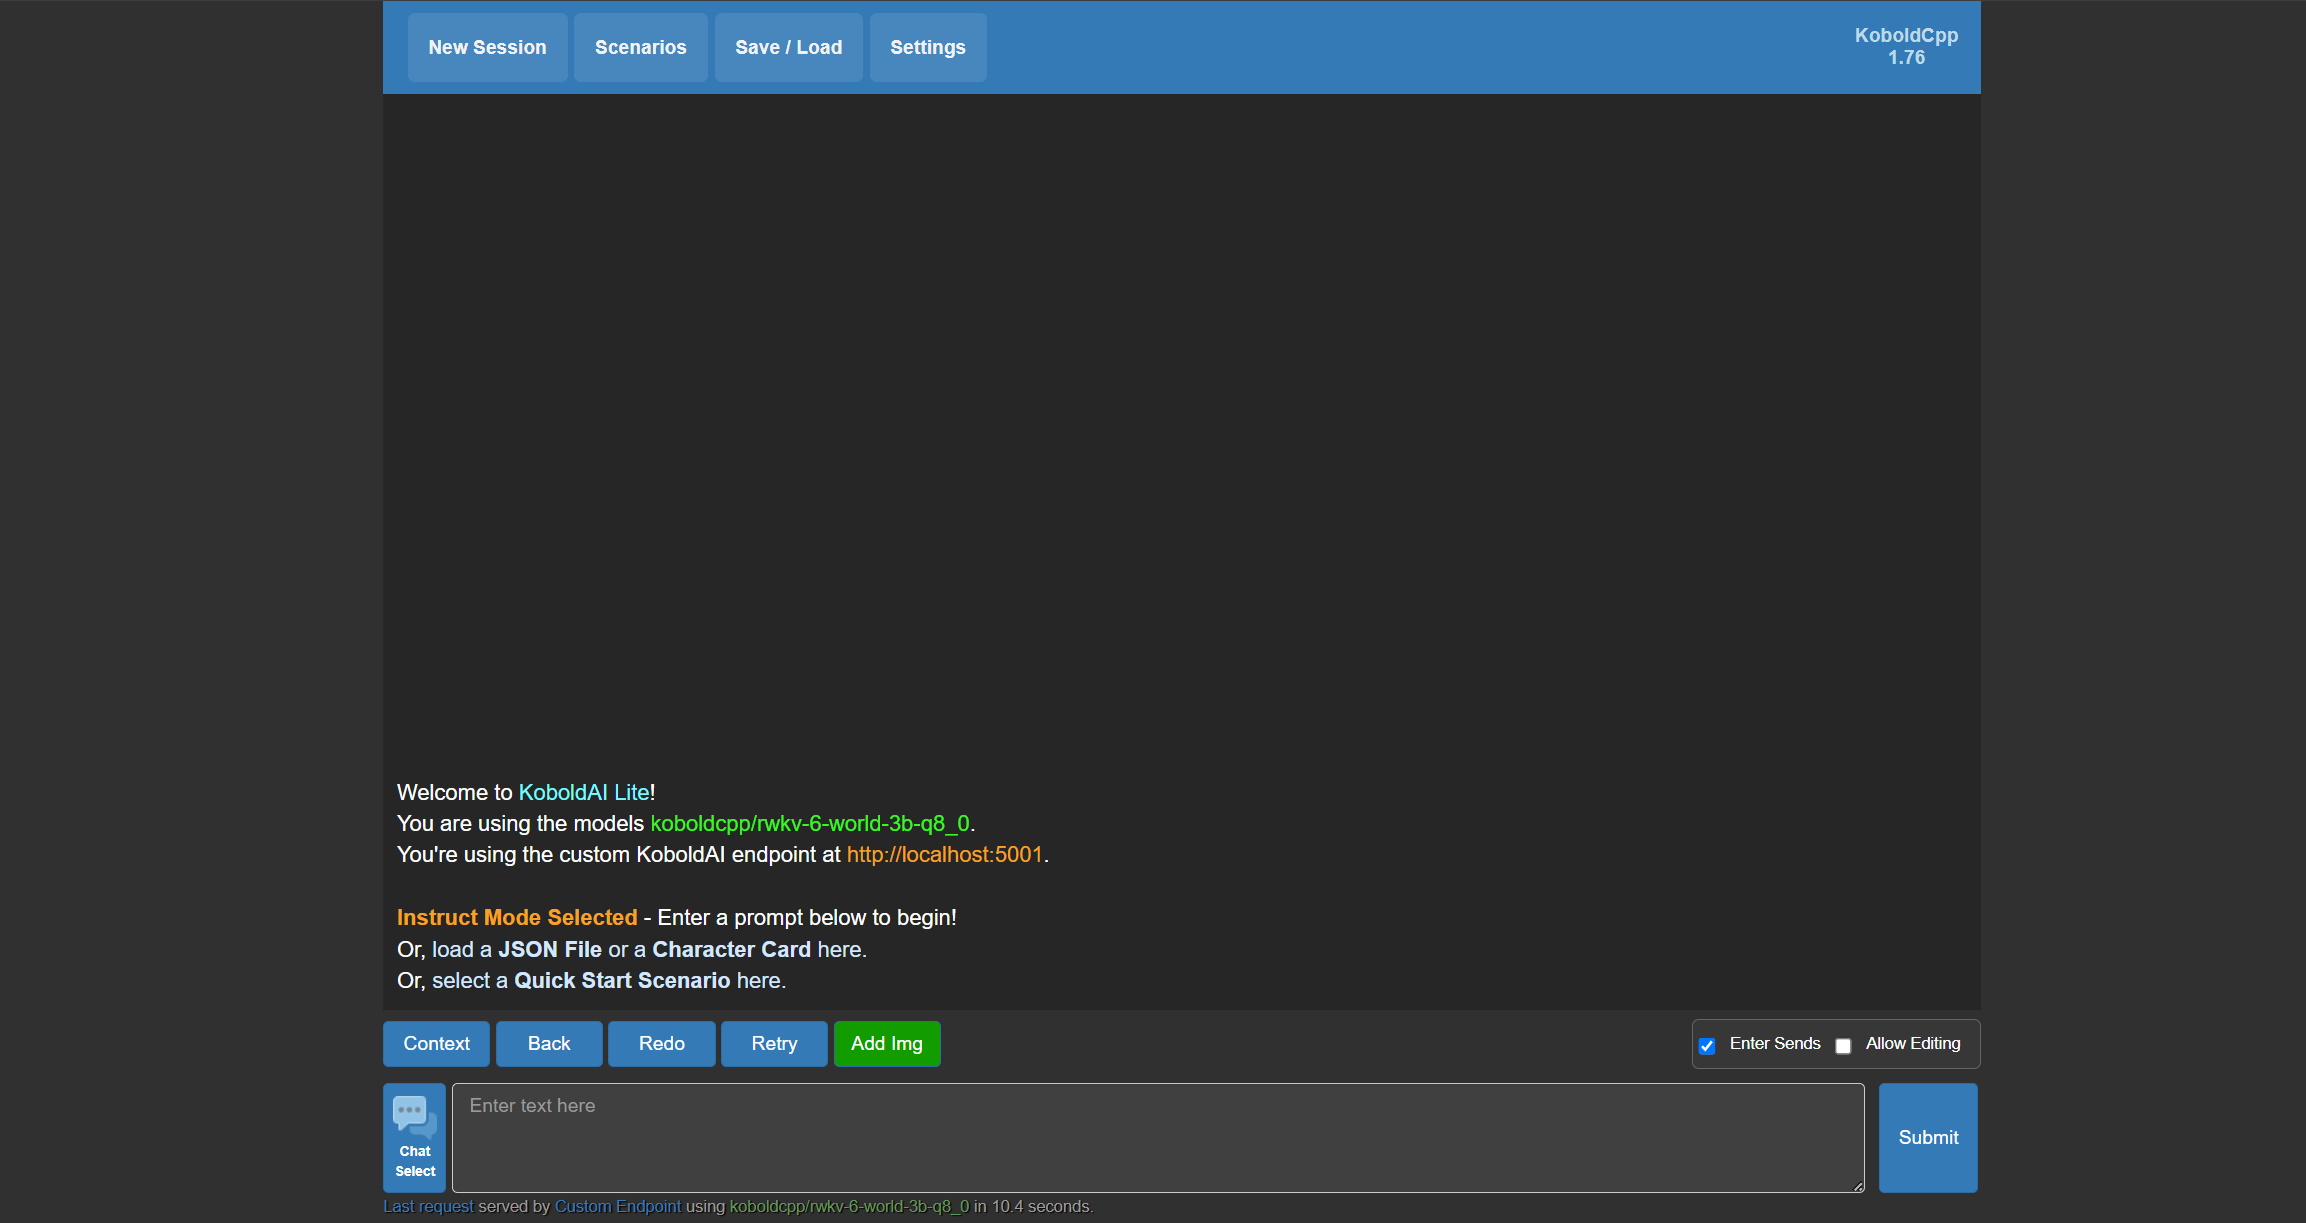
At this point, KoboldCpp is successfully running, and you can start using the RWKV model for text generation.
KoboldCpp Usage Guide
Change Conversation Mode
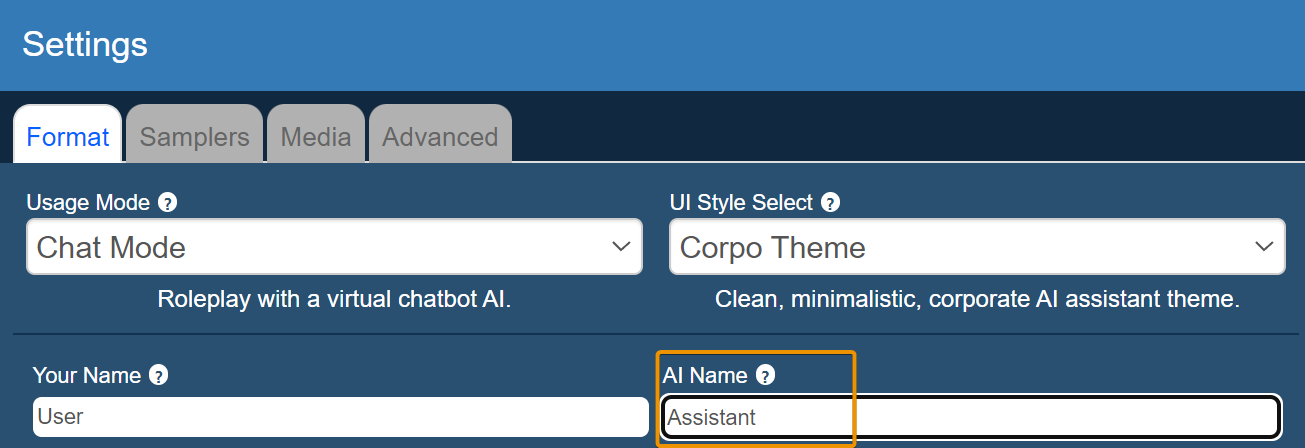
KoboldCpp supports four chat modes. In KoboldCpp's WebUI interface, click Settings -> Format -> Usage Mode to adjust the chat mode:
Instruct Mode: Instruction mode, suitable for text generation with instructionsStory Mode: Story mode, suitable for novel-style text generationAdventure Mode: Adventure mode, suitable for generating interactive fiction/role-playing games contentChat Mode: Chat mode, suitable for casual conversation
In our testing, RWKV models perform best in Instruct Mode and Chat Mode. Story Mode and Adventure Mode require additional character settings and configuration for proper use.
Tips
When using Chat Mode, please set the AI Name option to Assistant for the best conversation experience.
Change WebUI Style
KoboldCpp supports three WebUI styles. In KoboldCpp's WebUI interface, click Settings -> Format -> UI Style Select to adjust the WebUI style:
Classic Theme: Default theme, the default interface when accessing KoboldCppAesthetic Theme: Aesthetic theme, allows customization of UI size, background image, chat box background color, and other stylesCorpor Theme: Minimalist theme, similar to online services like ChatGPT
Corpor Theme is recommended:
Other Settings
Due to the large number of settings in KoboldCpp, this document cannot list complete setting descriptions.
For detailed explanations of each setting, please refer to the comments in the WebUI and the KoboldCpp Documentation.